Selasa, 27 Mei 2008

Tofu Tuesday - Ferment It

Fermented White Beancurd with Chilli in Sesame Oil

According to the omniscient Wikipedia, fermented tofu is made by allowing cubes of dried tofu to fully air-dry under hay and slowly ferment from aerial bacteria and fungal spores. Lovely.

Fermented tofu is sometimes referred to as Chinese cheese. It's pretty pungent stuff - it does smell a bit fruity, like a well-aged blue cheese. I have known others to eat it straight from the jar, which I have considered in the name of blog-testing, but... well... I can't. It just doesn't smell too good. In a recent episode of the F Word, Gordon Ramsey described it as a Chinese delicacy and blind-folded James Corden for him to eat raw. I didn't particularly agree that it was a delicacy (it's obtained quite easily and cheaply) but I did feel sorry for him.

However, when used to cook vegetables in, particularly stir-frying water spinach and other leafy greens, it's completely transformed.

The basic base to stir-frying vegetables with this fermented tofu lies in ginger, garlic and chilli. I finely dice equal amounts, and fry it in a little oil. Add one or two cubes of the fermented tofu and mash a little. Add the vegetables, maybe a splash of water or rice wine and stir-fry until cooked.

The fermented tofu makes the vegetables very fragrant, and your kitchen a little stinky, so keep your windows open. I like the smell of it frying but then again, I also like the smell of shrimp paste frying.

There is also fermented red beancurd which is mainly used in braising meats, as far as I can tell. I haven't used it... yet!

Senin, 26 Mei 2008

Squid - The Perfect Budget Food

One of my earliest memories of being on holiday was with my parents when we went to Phuket. There was a beach cafe we stumbled upon where you could sit at the bar on tall stools actually on the beach. My parents befriended the lady behind the bar, and she served us a massive great platter of calamari, completely fresh. It was gorgeous, and it's one of those times that I wish I were just a little bit older so my memory would be clearer.

Squid is the ultimate budget food, perfect for me as I seem to be perpetually budgeting. I buy 1kg bags of frozen cleaned and prepared squid tubes and tentacles for about £2.50 in Chinatown. It's also diverse - a really quick cooking at a high heat as well as a long, slow braise will result in sweet and tender meat. So far I haven't as yet stewed it, but that is next on the list.

So here's a recipe for Squid in Black Bean Sauce.

For One

200gr squid and tentacles, washed
1" ginger, chopped finely
1 fat clove of garlic, minced
1 red chilli, sliced
1 tbsp black beans, or 1 tbsp black bean sauce
1 tbsp rice wine
1/2 tbsp sugar
1 tbsp black or balsamic vinegar
1 tbsp light soy sauce
2 spring onions, sliced
1/2 tbsp cornflour, slaked
1 orange or green pepper, chopped roughly

Score the insides of the squid carefully, and then chop into chunks. Combine the black beans, rice wine, soy sauce, sugar and vinegar in a bowl and mix thoroughly. Heat up some oil and fry the ginger, garlic and chilli until fragrant but not burnt. Add the pepper and fry till softened. Next, add the squid, fry for a minute, then add the black bean sauce mixture, the cornflour, and cook until thickened. Garnish with spring onion and serve with rice.

The dish has a great texture, something I seem to be obsessed with recently - slightly crunchy peppers contrasts well with soft and tender squid. Black beans are very versatile and it's easy to knock up a sauce with it using ingredients that last forever. Pick some up if you see them.

Minggu, 25 Mei 2008

Soba Noodles with Peanut Sauce

Jenn came up to visit this weekend and so I thought cook up this simple little dish that I know she likes. Peanut sauces, either as a dipping sauce, or with chicken skewers or noodles, occupy a central place in the pantheon of North Americanized Asian cuisine and are always very popular. I find that restaurants often make the sauces a little too sweet, so I had a fun time trying to balance the different flavors making up this sauce.

img_7452.jpg

Recipe (Adapted from Ted Allen's The Food You Want To Eat, published at leitesculinaria.com)
1/4 cup sesame seeds
1/4 cup smooth peanut butter
1/4 cup toasted sesame oil
1/3 cup roasted peanuts
1/3 cup light soy sauce
1 tablespoon red wine vinegar
1 tablespoon mirin
2 medium garlic cloves
1 small cucumber
1/2 pound soba noodles
1/4 cup chopped fresh cilantro
3 scallions, sliced

Dry roast the sesame seeds in a wok or cast iron pan under medium for 3-5 minutes, stirring frequently. In a small food processor, blend the peanuts, sesame oil, half of the sesame seeds, peanut butter, soy sauce, vinegar, mirin and garlic until the consistency of a thick sauce. Slice the cucumbers in half lengthwise, scoop out the insides with a fork and slice into U-shaped pieces. Cook the noodles in boiling water as directed on the package. Drain, rinse in cold water, and re-immerse in some boiling to reheat. Drain again, mix in with the sauce, cucumber, scallions, cilantro and remaining sesame seeds. Serve hot or cold.

Sabtu, 24 Mei 2008

My Guilty Pleasure

I don't feel guilty or ashamed about most things I like to eat (including Spam) but Cup Noodles usually make me feel a little seedy. Maybe because you eat them out of a cup, or perhaps it's because I usually eat them when hungover.

Today is no exception; a terrible hangover had me straight for the noodle cupboard. It's one of those hangovers that has me chugging the tea like no tomorrow (why oh why don't they make pint-sized mugs?) and an insatiable hunger. A full-on fried breakfast consisting of fried bread, bacon, eggs, bubble & squeak and fried tomatoes did little to help me on my way. By the time I'd waddled home from the caff it was time for round two.

Cup Noodles are infinitely superior to the Pot Noodle. Pot Noodles are horrors - with flavours like Chicken Satay, Curry and Sweet & Sour, you only need to try them once to know they're not right. Cup Noodles even have dehyrated pieces of sweetcorn, seaweed, spring onion and fake crab stick - how can that be bad?

The shame is over. I will eat my Cup Noodles with pride.

Kamis, 22 Mei 2008

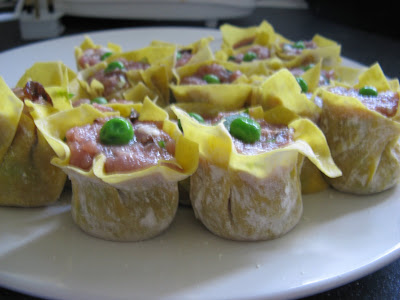
Siu Mai


Siu mai is one of the most popular dim sum dishes, and quite rightly so. The mixture of pork and prawn, mixed into a paste gives it a springy texture whilst the mushrooms gives them a good savoury depth. If you have access to Chinese ingredients, such as wonton skins, then siu mai is very easy to make and you should definitely give it a try. Wonton wrappers are made with a fine wheat dough and lye water. I don't bother making them myself - life is too short.

Siu Mai

Makes about 24 dumplings

200gr minced pork

150gr chopped raw prawns

3 dried shiitake mushrooms, redydrated and chopped

2 spring onions, chopped finely

Soy sauce to taste

Sesame oil

Pinch of ground white pepper

Won ton skins

Mix all the filling ingredients well, until it becomes a paste. Leave for half an hour in the fridge. When it comes to making the dumplings, place a wonton wrapper on top of an O made by your thumb and index finger, like the picture above. Add a tablespoon of the mixture to the wrapper and push down to make the dumpling. You may have to trim some of the wrapper off (I did). Finish by topping with a dice of carrot, or a pea.

To cook the dumplings, steam on greaseproof paper in a steamer for roughly 10 - 12 minutes. Serve with black vinegar with matchsticks of ginger and/or chilli sauce.

Rabu, 21 Mei 2008

Seared Sesame Seed Tuna Sandwich

I just ended my rotation at the 'sandwich station' of the restaurant. Sandwiches are often very underrated, and considered to be the cheap relative to a fancy meal. The sandwich station at the restaurant is a way for us culinary students to re-think this all-time lunch favorite. I decided to try making a gourmet fresh tuna sandwich, with velvety avocado and a soy and scallion marinade.

Up to now, we had only been assigned recipes that had been tested by our chefs and that we tried to execute as best we could for our customers. This was thus a new opportunity to get creative, and come up with a different sandwich special to be served every day.

Since then I have begun my last month of school culinary .. so, if all goes well, I will be adorned with a chef's hat in a month exactly!


tuna-sandwich.jpg

Recipe:
Tuna loin
Sesame seeds
2 scallions
2 tablespoons of soy sauce
1 tablespoon of rice wine vinegar
1 teaspoon of sesame oil
2 teaspoons of lemon juice
1/2 avocado, sliced
Salt and Pepper
Olive oil and canola oil
Bordelais bread

Cut the bread into thin slices. Brush with olive oil and sprinkle with salt and pepper. Grill to obtain a nice grill mark and set aside. Season the tuna loin on all sides, generously, with salt and pepper. Pat with an even coat of sesame seeds making sure all sides are covered. Place a pan on high heat. Once it's warm, drizzle in some canola oil. Once the pan is steaming hot (and the oil starts to fume) delicately place the tuna loin inside. Make sure the oil is hot enough or the tuna will stick to the pan. Sear the tuna on all sides until the sesame seeds are nicely golden. Leave to rest on a cooling rack.
In a bowl, mix the soy sauce, lemon juice, rice wine vinegar and sesame oil. Taste and adjust seasoning and acidity. Add the thinly sliced scallions.
Carefully slice the tuna. Layer the tuna on the bread alternating with the slices of avocado. Sprinkle with salt and pepper and drizzle with the marinade. Enjoy!

Selasa, 20 Mei 2008

Tofu Tuesday - Steamed Tofu With Mushrooms & Prawns

Tofu Tuesday is under way. As much as I'd love to make agedashi tofu again (seriously - I'm craving it) it wouldn't make for very interesting blogging. So I ploughed on with a new recipe.

Having a google around, there weren't many tofu recipes I found particularly interesting. Many of them are vegetarian recipes which uses tofu as a protein element. I'm not against vegetarianism, far from it in fact, but I wanted to use tofu as a centre piece, rather than using it to replace something else. Since I deep-fried last week, I also wanted to use a different method of cooking it. I combined some ideas from this recipe, and also a recipe Josh from Cooking The Books sent me, to come up with this.

Steamed Tofu With Mushroom & Prawns

To serve one

5 raw shelled prawns

5 dried shiitake mushrooms, soaked in hot water for 1/2 an hour.

1/2 box of firm silken tofu - I use this brand

1 spring onion, sliced on the diagonal

1 red bird's eye chilli, sliced

1 inch ginger, grated

2 tbsp oyster sauce (or to taste), loosened with a little hot water.

1 tsp sesame oil

Slice the tofu very carefully into 5 slices. Layer on a plate to fit in the steamer with the rehydrated mushrooms and prawns, alternating. Scatter the ginger, chilli and spring onion on top. Steam for roughly 10 mins, or until the prawns just turn pink. Once cooked, drain the juices from the plate and pour the loosened oyster sauce over the tofu and drizzle the sesame oil on top.

I served this with white rice and choi sum stir-fried in chilli, garlic and ginger. The tofu was lovely - really clean-tasting and quite refreshing, not at all heavy. The contrasting textures between the soft tofu, the succulent mushrooms and the slight crunch of the prawns was very pleasing; the tofu did it's job well.

Sabtu, 17 Mei 2008

Over-Night Bread

This is my second attempt at baking bread. I was quite nervous, as my previous attempt, a rosemary focaccia, flopped spectacularly. It was all going so well and had looked just like the recipe. However, the shelf of the oven was being used as a grill rack for an improvised shopping-trolley-barbeque (!!) so when it came to baking and we were still using the shelf, the focaccia had to wait. For a long time. Eventually when the oven was useable, I thought it looked a bit too puffy and flattened it a bit. It came out like a piece of cardboard. That'll teach me for drinking and attempting to bake.

This recipe came from here, but I adapted it as I only had white bread flour. I had only read part of the recipe and had not realised how long it would take, so for the last 45 mins of proving, I stuck it in the fridge, ready to bake in the morning. I attribute it's shortness to this, but it was still very tasty. In fact, it was great sliced in a ciabatta style, lengthways. So here's my version.

Over-night Bread

125gr warm water

1 level teaspoon of easy-blend yeast

300gr white bread flour, split into 100gr and 200gr

125gr cold water

1 level tsp fine salt

Olive oil

Combine the yeast and the warm water in a bowl, cover and leave for two hours. Add the rest of the flour, cold water and salt and stir well. Get your hands in there to get it thoroughly mixed - this is a messy recipe. Cover for 15 mins to hydrate.

Rub some oil on your hands and pat some on top of the dough. Knead for 15 seconds, cover and leave it for 45 minutes. Knead for 15 seconds every 15 minutes. Finally, knead for another 30 seconds, and place it in your oiled and floured 2lb loaf tin. Cover, place in the fridge over-night.

In the morning, take out of the fridge and leave to warm up to room temperature. Sash the top with a shard knife and dust with flour. Pre-heat the oven to 220 degrees celcius. Add a baking tray with some ice cubes to create steam, and put the loaf in. Bake for 20 mins, then reduce the temperature to 200 degrees celcius and bake for a further 20 mins. Turn out on a wire rack and leave to cool before eating.

It's a really great recipe for the weekend - I got in on Friday night and it was great to have freshly baked bread for my Saturday morning breakfast / brunch.

Kamis, 15 Mei 2008

Passion Fruit Baked Alaska

Pastry can seem a little daunting to a lot of cooks. Measurements are much more key than for savory recipes, and the job often more tedious. However, for me, it's usually pure joy. I have always enjoyed the wonders that come out of pastry kitchens, so being able to work all day with a pastry chef was a sort of childhood dream come true. The smell of the pastry kitchen was also a pleasant change from the steaming hot fish and meat stations, and the calm found there was soothing.

These Baked Alaska were a real pleasure for the eye. I also like the element of surprise: how this spiky white coat hides a soft and smooth scoop of ice cream and a chocolaty moist cake. Speaking of the cake.. it is addictive. It would work nicely to make ice cream sandwiches with, and is really easy and quick to make.

The only problem with this dessert is having to serve it quickly so it doesn't start to melt. I will let you imagine what that can cause in a professional kitchen when the whole restaurant suddenly wants a Baked Alaska for dessert!

alaska1.jpg

Base Cake:
345 grams of bittersweet chocolate
8 eggs, separated
2 tablespoons of vanilla extract
1 1/2 tablespoons of espresso extract
Large pinch of Kosher salt
140 grams of granulated sugar

Meringue
4 egg whites
200 of granulated sugar

Passion fruit ice cream
Rasberries, for garnish

For the cake:
Preheat your oven to 325 F (162 C). Melt the chocolate in a double boiler. In the meantime, in a large bowl, whisk the egg yolks, extracts, and salt. Temper the yolk mixture with the melted chocolate (by adding a little chocolate at first, mixing well and then adding the rest of the chocolate).
In an electric mixer bowl, place the egg whites and sugar. Mix until soft peaks form. Gently fold the meringue into the chocolate mixture unti, just blended in. Grease a parchment-lined cookie sheet (with Pam!) and pour the chocolate mixture in. With a pastry scraper flatten out the mixture to obtain an even 1/4 inch layer. Bake for 5-6 minutes or until the cake is just set.
Leave the cake to cool. Once it has, using a cookie cutter just slightly bigger than an ice cream scoop, cut out chocolate cake circles and lay them out small cookie sheet. Scoop a scoop of ice cream in the center of each circle (as quickly as possible so that the ice cream does not get a chance to melt) and place in the freezer. In the meantime, make your meringue.

Meringue
In a bowl, whisk the egg whites and sugar together until well combined. Place the bowl over a pot of simmering water. The bowl should fit the top of the pot snuggly but the water should not touch the bowl. The water should not boil or the eggs will scramble. Whisk constantly so that the eggs do not get a chance to coagulate. Once the egg mixture is a little warmer than body temperature (about 110 degrees) turn off the heat. Place the mixture in a electric mixing bowl. Whisk until stiff peaks form and the mixture is glossy.
Place the mixture into a piping bag with a medium size tip. Take the cakes and their scoops out of the freezer. Pipe little meringue peaks all around the ice cream, making they are all close to one another. If the ice cream is melting too fast, you might have to put it back in the freezer for a few minutes before piping again. Once the meringue is piped all around the ice cream, quickly torch the sides of the meringue, making wave movements, and working quickly so that the meringue does not burn.

Serve with raspberries. Enjoy!

Selasa, 13 Mei 2008

Agedashi Tofu - A Japanese Way of Eating


I recently tried Agedashi Tofu in my favourite Japanese restaurant, Ten Ten Tei. I was instantly addicted; silky smooth tofu, covered in a light, crisp coating and served in a light, slightly fishy and deeply savoury broth. I was only disappointed that there wasn't more of it, as I got only one measly lump so of course I decided to make it myself - so that I could eat as much as I like!

Tofu is often highly under-rated. Everyone I know regards it as a foodstuff for vegetarians, a protein for people who don't eat meat. This really isn't so - tofu is such a complex ingredient on so many levels. It's all about the texture of it, such as lumps of firm tofu in soups like miso soup or the Sichuan hot and sour soup. Similarly, deep fried tofu is succulent when stuffed and braised, taking on flavours from the braising liquid.

Agedashi Tofu

For two greedy people as a side

1 block firm tofu (I use Mori-Nu silken kind)

2 spring onions, chopped

1 tsp wakame seaweed, rehydrated

200mls dashi (or light fish) stock

2 tbsp mirin

2 tbsp Japanese soy sauce

Pinch of Sugar

A little grated ginger

Cornflour

Oil for deep frying

Remove the tofu from it's packaging and drain well. Pat dry with kitchen paper and cut into large chunks. Meanwhile, boil together the dashi stock (you can buy powder sachets from the Japan Centre) with the mirin, soy sauce and sugar. Heat up some oil to deep frying heat, when a breadcrumb sizzles. Coat the tofu in cornflour and carefully add to the oil. Fry until golden brown, drain on kitchen paper. Add to your bowl, sprinkle with grated ginger, spring onion, wakame seaweed and add some of the broth. Serve immediately.

I served this with miso aubergines, cucumber salad (adapted from BBC Good Food) and white rice. I was really surprised with how it turned out - it was absolutely delicious. I didn't miss meat at all in my meal, as the tofu made for a meaty texture. Definitely a favourite to add to the repertoire.

Perhaps the beginning of Tofu Tuesday?

Minggu, 11 Mei 2008

Chicken Piccata

I have been meaning to post this recipe for a while, but for some reason I never got around to taking a picture of it. We have talked a lot about flavor combinations at school and what makes a dish work. The three components that seem to come back in various forms are a mix of saltiness, fat and acidic flavors. Chicken piccata makes perfect use of all three: saltiness with capers, fat with butter and acid with lemon. This really is one of my favorite dishes. It's so simple to make, and also works great with fish.

I have moved on to the pasty section of the kitchen, so I will be posting about those adventures very soon. I have a newfound appreciation for kitchen life everyday. It definitely is one of the most physical jobs I have ever had, at times one of the most stressful, but generally one of the most pleasing. There is just something so special about spending time concocting flavors and aromas for the unique goal of pleasing.

chickenpiccata3.jpg

Recipe for two (adapted from the Barefoot Contessa)

2 split (1 whole) boneless, skinless chicken breasts
Kosher salt and freshly ground black pepper
1/2 cup all-purpose flour
1 egg
1/2 tablespoon water
3/4 cup seasoned dry bread crumbs
Good olive oil
3 tablespoons unsalted butter, room temperature, divided
1/3 cup freshly squeezed lemon juice (2 lemons)
1/2 cup dry white wine
2 tablespoons of capers, washed and drained
Sliced lemon, for serving
2 teaspoons of dried oregano

Preheat the oven to 400 degrees F. Line a sheet pan with parchment paper.
Place each chicken breast between 2 sheets of parchment paper or plastic wrap and pound out to 1/4-inch thick. Sprinkle both sides with salt and pepper and dried oregano.

Mix the flour, 1/2 teaspoon salt, and 1/4 teaspoon of pepper in a shallow plate. In a second plate, beat the egg and 1/2 tablespoon of water together. Place the bread crumbs on a third plate. Dip each chicken breast first in the flour, shake off the excess, and then dip in the egg and bread crumb mixtures.

Heat 1 tablespoon of olive oil in a large saute pan over medium to medium-low heat. Add the chicken breasts and cook for 2 minutes on each side, until browned. Place them on the sheet pan and allow them to bake for 5 to 10 minutes while you make the sauce.

For the sauce, wipe out the saute pan with a dry paper towel. Over medium heat, melt 1 tablespoon of the butter and then add the lemon juice, wine, 1/2 teaspoon salt, and 1/4 teaspoon pepper. Boil over high heat until reduced in half, about 2 minutes. Off the heat, add the remaining 2 tablespoons of butter and the capers, and swirl to combine. Pour the sauce over the chicken breasts. Enjoy!

Sabtu, 10 Mei 2008

A Cake For Girls

Quite lurid, isn't it?

In my quest to bake more, I came across a recipe (from Nigella, originally) for beetroot and cranberry cake. The Romans considered beetroot to be an aphrodisiac, and apparently the belief is still held today that if a man and a woman eat from the same beetroot, they will fall in love.

The promise of pink cake mixture appealed to my girly side and indeed it was pink. So were my fingers, nails and everything I touched.

Beetroot and Cranberry Cake

1 large or 2 small uncooked beetroot, weighing about 200gr
200gr very soft unsalted butter
Grated zest and juice 1/2 lemon
200gr caster sugar
4 large eggs at room temperature
150gr dried cranberries
1/2 teaspoon ground nutmeg
150gr plain flour, sifted
150gr self-raising flour, sifted
2lb loaf tin, lined with baking parchment

Method:

Preheat the oven to 180°C, 350°F, gas mark 4.

Peel the beetroot, then grate it using the finer grating blade of a food processor or fine side of a hand grater.

In a large bowl, beat the butter, lemon zest and sugar together until pale and creamy, then add the eggs one at a time, beating in well.

Stir in the beetroot, dried cranberries, lemon juice and nutmeg.

Stir in the flours and spoon the mixture into the loaf tin, spreading evenly.

Bake on the middle shelf of the preheated oven for 50 - 60 minutes, or until a skewer comes out clean. Let the loaf cake cool in the tin, then set on a rack, before turning it out and slicing thickly.

The cake was very moist and just the right sweetness. The dried cranberries plumped out during the baking and became fat and juicy, the beetroot lent itself to a subte earthiness. The flavours were slightly reminiscent of Christmas, due to the nutmeg. Sadly the cake itself lost some of it's pinkness, but perhaps that isn't such a bad thing...

Selasa, 06 Mei 2008

Salt and Pepper Shrimp

So here I am with my first post in far too long. I have to apologize, as Jenn is the one who spends most of her day in a professional kitchen and yet she is the one who still finds time to come home and post in her spare time!

Salt and Pepper Shrimp is a pretty much a standard at most chinese restaurants, and is usually done deep-fried. This variation (another winner from Into the Vietnamese Kitchen) is a pan-fried version that is really simple, and delicious. It's great for those evenings when you're both short on time and have an empty fridge (the only perishable thing it calls for is ginger and scallions). It's traditional to use smaller, thin-shelled shrimp and eat them whole (the shell crisps up nicely and gives a nice crunch), but I've used peeled as well with great success.

shrimp2.jpg

Recipe:

2 teaspoons of cornstarch
1 teaspoon of salt
1 teaspoon of pepper
1 teaspoon of sugar
400g of small, frozen shrimp.

2 cloves of garlic, sliced.
2 inch piece of ginger, sliced
3-4 scallions cut into 1 inch pieces
3-4 dried chilies, deseeded and cut in half (optional)

Defrost, trim and rise the shrimp. Mix together the cornstarch, salt, pepper and sugar and add the shrimp. Heat a wok or cast-iron pan on medium-high heat. Add a tablespoon of oil. Spread the shrimp on the pan in a single layer, being careful not to crowd the pan. Cook in batches if necessary. Leave the shrimp untouched for 30-45 seconds, allowing them to crisp. Gently turn them over, to do the other side. Stir fry gently for another 2-3 minutes and remove the shrimp from the pan.

Lower the heat to medium low, add a little more oil. Add the ginger, garlic, and chiles (if using), and stir fry gently to release the flavor into the oil. Just as the garlic begins to crisp, add the scallions and the shrimp back into the wok. Stir fry for 20-30 seconds. Serve with rice.

Senin, 05 Mei 2008

Salad Days


After the excesses of the weekend in Bruges, it was time for some lighter dinners. The weather is also getting warmer which make healthy eating easier. Sadly the Tesco Metros and Sainsburys Locals of Central London aren't exactly well stocked; bags of pre-washed leaves, shrink-wrapped cucumbers, bright orange tomatoes. I made do with what I had on offer and came out with a very tasty dinner.

Salmon is one thing I'm quite particular with about the way it's cooked. I prefer it steamed or poached, I find grilling or frying it makes it overly rich. By using fish sauce, lime and chilli in the dressing, it made for a refreshing change from the usual vinaigrette

Salmon and Udon Noodle Salad

For one

1 salmon fillet

Juice of 1/2 a lime

1" ginger, grated

1 red chilli, sliced finely

1 tbsp coriander and 1 of mint, chopped

1 tbsp fish sauce

1 tsp sugar

Combine the above ingredients and coat the salmon fillet in it. Leave to marinate for 30 mins.

Place the salmon fillet including the marinade in a foil pouch and bake in the oven for 10 - 15 minutes, or until just done. Leave to cool.

Assemble a salad with whatever veg you have - I had mixed leaves, mushrooms, butter beans, spring onion and cherry tomatoes. Cook some udon noodles and refresh. Toss in soy sauce and lay over the veg mixture. Flake the salmon on top, and combine it all with the juices from the foil pouch.

Jumat, 02 Mei 2008

Seared Salmon with Pea Risotto and Tomato Puree

I have started cooking for the school's restaurant, and, to say the truth, it has been quite the ride so far. There is a mix of stress, excitement, and genuine pleasure which all mixed together make for fast-paced days with very little time to rest. I am getting used to all the organization that a professional kitchen demands, and the real pleasure of cooking for busy and hungry New Yorkers.

A lot of the time spent in a kitchen is prep work. In the morning, fish or meat must be prepared, cleaned, portioned and made ready to use. Vegetables must be pre-cooked, and certain things cooked partially only. Risotto, which has quite a fussy texture for instance, must be cooked 80% of the way in the morning, and then set to cool by being spread on parchment-lined sheet pans. The risotto is then re-moistened with chicken stock when ordered, and then garnished with finishing touches such as cheese and peas.

Kitchen life, in many ways, resembles the strict setup of army life. Organization is key, hierarchies must be respected, and the chef must be addressed by reminding oneself that he or she is, indeed, the leader of the day. "Yes chef", and "no chef" are the only acceptable answers to be pronounced. The "barker", or frenetically angry cook at the front of the kitchen makes sure that orders are respected and deadlines not passed. He screams "order in" once a meal had been ordered, and "fire" once the meal is to be brought to the customer right away. The cooks are expected to be disciplined, respectful of orders and extremely meticulous.
Although, I have never experienced the battlefield firsthand, I can rest assured that life in the kitchen has already brought me pretty close.

salmon.jpg

Recipe
Salmon:
4 salmon fillets
2 tablespoons of whole butter
A drizzle of blended oil
Salt and pepper

Risotto:
About 3 cups of chicken stock
1 cup of arborio rice
A knob of butter
2 minced shallots
2 minced garlic cloves
2 sprigs of thyme
1 bay leaf
1 glass of white wine
A good handful of grated Parmesan cheese
A handful of peas, cooked

Pea Puree
1/4 cup of heavy cream
3 tablespoons of water
Salt and Pepper
1/2 cup of peas

Tomato Broth:
4 tomatoes
1 minced shallot
1 minced garlic clove
1 sprig of thyme
Salt and pepper to taste
1/2 teaspoon of sugar

Garnish
Chopped chives
Basil leaves

Pea Puree:
Start by making the pea puree. In a blender, mix the peas, water, salt and pepper and blend until smooth. Transfer to a bowl and add the cream. Mix well.

Tomato Broth:
Take two of the tomatoes, remove the cores and chop in half. Remove the seed and transfer to a separate bowl. Using a blender, blend the tomatoes until you obtain a smooth puree. Strain through a fine strainer. Disregard the tomato foam that is too thick to be strained. Transfer the strained liquid to a bowl, add the sugar, and salt and pepper to taste. Strain the seeds as well, and add the liquid strained to the bowl. Reserve.
Peel and core the other 2 tomatoes. Chop finely. In a pan, heat some oil and add the shallots, garlic and thyme. Once the shallots are softened, add the tomatoes. Season. Cook on low heat until the moisture has mostly evaporated. Reserve.
Risotto:
Heat the stock in a pot - bring to a boil and reduce to a low simmer. Melt the butter in a pan on medium low heat and add the shallots, garlic, thyme and bay leaf. When the shallots begin to soften, add the rice. Mix with a wooden spoon until lightly toasted. Add the wine and stir constantly. Once the wine has evaporated, add the stock, ladle by ladle, gently stirring. Add more stock once the rice has absorbed the liquid. Adjust the seasoning during this process. After about 18 minutes of cooking time, the rice should be tender and creamy. Add the cheese, peas, pea puree and stir until smooth.

Salmon:
Preheat oven to 450 F. Season the fillets with salt and pepper. Drizzle some oil in a oven-proof pan on medium high heat. Once the oil is hot, add the salmon, skin side down. Press the fish down to make sure it does not curl. Once the fish skin begins to become crispy (after 2-3 minutes), add the knob of butter. Gently pour the fat out of the pan and transfer to the oven. Cook for an additional 1-3 minutes for a medium rare salmon.

In a pan, heat the two types of tomato preparations together.

Plate by placing a circle of risotto in the middle of each plate. Circle with the tomato broth and top with the salmon fillet, some basil leaves and chopped chives . Enjoy!