Minggu, 29 Juni 2008

Moro Cooking - Aubergine & Red Pepper Salad

I have a terrible habit of buying cookery books, pouring over them hungrily, and then leaving on the shelf, never to be cooked from. I decided that this should change, so I tackled a recipe from the Moro cookbook.

I've never been to the restaurant, nor have I tried Moorish food but this recipe was very straight-forward. It also used one of my favourite vegetables: the aubergine. Given the current rising food costs and my seemingly-perpetual poorness, I've been shopping at Lewisham market recently. It really is a god-send; I picked up half a kilo of baby plum tomatoes for 58p, 3 aubergines for £1.20 and three peppers for £1. This was almost half the price of nearby Sainsburys.

So anyway, the recipe.

Aubergine & Red Pepper Salad

Serves 4 as a side

3 aubergines
3 red peppers (I used 2 red and one yellow)
1 garlic clove, crushed
A squeeze of lemon
2 tbsp olive oil
200gr low fat yoghurt
Caramelised butter, about 30gr
A few sprigs of fresh coriander
Salt and pepper

Prick the aubergines and peppers and roast in the oven until the aubergines have collapsed. The aubergines take about 45 mins and the peppers about 25 mins, on gas mark 7. Remove from the oven and allow to cool slightly. Peel the skin from the peppers and the aubergines. Chop the aubergine flesh roughly and spread out on a plate. Add the olive oil, lemon juice, garlic, salt and pepper and toss. Deskin the peppers and chop into slices. Drape this over the aubergine. Spoon the yoghurt on one side of the dish.

To make caramelised butter, heat some unsalted butter in a pan. Continue to heat it, swirling it around the pan occasionally, until the sediment in the pan becomes brown, but doesn't burn. Pour this over the dish. Serve with flatbreads.

This was a really delicious introduction to Moorish food. I think that amount of yoghurt was a touch too much, so I might reduce it by half next time. I think a bit of minced lamb with parsley, added to this dish, would make a great meal.

Rabu, 25 Juni 2008

Salmon Tartare with Pickled Cucumbers, Red Onions and Capers

tartar2_websize2.jpg
An amuse bouche usually consists of a small bite-size treat, courtesy of the chef, that opens up your palate for the meal to come. They are sometimes incredibly intricate, sometimes very simple, and are meant to showcase the restaurant's culinary vision. One of the stations at the French Culinary Institute's restaurant comes up with a different amuse bouche every day. When my turn arrived, I came up with this concoction, a fresh way to get your appetite going on a warm sunny day. The tricky part was to plate quickly as the customers ordered their food. The salmon had to be mixed with the marinade at the last minute to ensure that the salmon would maintain its vivid orange color, so we rapidly found ourselves plating a dozen tartares at a time. It was worth it though, as the plates looked beautiful and the salmon turned out tasty, yet simple. You can definitely serve this as an appetizer as I did with the leftovers.

Since then, I have graduated, and been adorned with a proper chef's hat! The real professional kitchen life will come soon, but I am for now savoring a bit of relaxing time after an intense 6 months of training to become a chef.

tartar_websize1.jpg

Recipe
Salmon fillet
A handful of capers, rinsed and coarsely chopped
One diced red onion
2 tablespoons yuzu juice
Extra virgin olive oil
1/4 cup of rice wine vinegar
1/4 lemon, juice and zest
Salt and pepper
1/2 cup of parmesan
Half cucumber, sliced very thin
Chives, to garnish

Place the cucumber in a bowl. Add the rice wine vinegar and yuzu. Taste and adjust seasoning with salt and pepper. Leave for at least an hour in the fridge so that the cucumbers get a nice pickly taste.

Preheat oven to 350 degrees F. Grate parmesan and spread on a silk pad sheet set on top of a sheet pan. If you don't have one, you can use parchment paper. Spread the cheese on an even layer making a rough rectangular shape. Bake for 8 to 10 minutes or until the cheese is melted. Break into pieces and reserve.

Dice the salmon and place it into a bowl. Remove any gray areas in the flesh, as well as the skin. Cover and place in the fridge. In a separate bowl, mix the red onions, capers, lemon juice and zest. Drizzle generously with olive oil. Add salt and pepper to taste. Once you are ready to serve, add the caper and onion mixture to the salmon. Do not do this too much in advance or the salmon will change color with the acidity of the lemon.

Place a mound of salmon tartare on the plate, and serve with cucumber, a piece of parmesan and a piece of chive as you please. Enjoy!

Tofu Tuesday on a Wednesday - Braised Pork & Potato with Red Fermented Beancurd

Ok, so it's Wednesday. I got home late on Tuesday night and started making this, but then got hungry waiting for it to cook I had to scoff some Mi Goreng noodles. Thankfully this is the kind of recipe that benefits from the flavours sitting overnight to amalgamate. I was also able to use my new claypot that I bought for £3. Claypots need to be soaked for 24 hours before their first use, and then whatever you cook needs to be in the oven, gradually building heat otherwise it'll shatter. It was a bit nerve-racking, especially when you're hungry.

I won't lie to you; red fermented tofu bloody stinks. I opened the jar and had a tentative sniff and I almost decided not to go through with this recipe. When frying it, it transformed. It's similar to the kind of stink you get from frying shrimp paste - ultimately you know something delicious will come of it.

This is not my recipe, but that of Sunflower's. I've adapted it to fit in my pot and my belly.

Braised Pork & Potato with Red Fermented Beancurd

Serves 2, or 1 generously

250gr belly pork, in chunks
1 tbsp dark soy sauce
Splash of light soy sauce
Pinch of ground pepper

3 fist-sized potatoes, cut into chunks
60mls vegetable oil

1 Asian shallot, chopped finely
2 cloves of garlic, minced
3 slices of ginger
1 square of red beancurd
1 tsp five spice
Splash of Shaoxing cooking wine
1 tsp sugar
1 stalk of spring onion, chopped (optional)

Mix the belly pork with the soy sauces and pepper. Leave to marinate while you prepare everything else. Heat up the oil in a wok until almost smoking. Carefully add the potatoes and fry until browned on all sides - this will take about 10 minutes. Put the potatoes to one side. Pour off the oil, leaving 1 tbsp left. Fry the garlic, shallot and ginger until fragrant. Open the windows, add the beancurd and mash the cube up. Add the pork, leaving the marinade in the bowl, and fry until browned (once again, this will take about 10 mins). Add the wine, the 5 spice and any excess marinade. Bring to the boil, then place the wok contents in the claypot or any other suitable oven proof pot. Add the potatoes in, and then enough boiling water to cover at least the meat. Put the lid on, and stew for 1.5 hours. Here I put it in a cold oven and turned it on to 170 degrees.

The pork becomes meltingly tender. The potatoes hold their shape due to the initial frying, but they also soak up all the flavours of the stew. They're very strong flavours, and less is more with this dish. I think I might prefer it with white rice rather than potatoes - but then I'd always prefer rice.

Sabtu, 21 Juni 2008

Purple Basil

While I was in Cornwall, I picked up a purple basil plant from the Eden Project as a kind of souvenir. I haven't got particularly green fingers and I don't know a lot about plants, so I figured an edible one would be the best. The one I got was from the Ocimum Basilicum family - the type was 'Magic Mountain', apparently one of the best ornamental basils, with tall spikes of blue flowers.

Ornamental or not, it's a really fragrant plant. During the 6 hour drive home, it kept the stench of the cheese we bought at the local farm shop in Padstow at bay (thank god).

I wanted to use the leaves in a simple recipe. I didn't fancy pesto much, so just tossed with pasta seemed like the next best choice. A trip to Lewisham market yielded some British asparagus, my first this year, and some ridiculously cheap baby plum tomatoes. They were very sweet and the basil complemented them perfectly.


Spaghetti with Baby Plum Tomatoes,
Parma Ham & Asparagus

Serves 2

300gr spaghetti
A handful of baby plum tomatoes, sliced in half
1 small bundle of asparagus
1 clove garlic
4 slices of Parma ham
10 purple basil leaves
Extra virgin olive oil
Parmesan (optional)

Set the spaghetti on to cook. Meanwhile, fry the crushed clove of garlic in some oil until fragrant. Add the halved tomatoes and fry very gently. 5 minutes before the pasta is done, add the spears of the asparagus, chopped into bitesized pieces. 3 mins later, add the tips. When cooked, drain and put back into the saucepan. Add the basil leaves, ripped up, with the tomatoes and garlic. Toss with some extra virgin olive oil, and plate up. Rip 2 slices of Parma ham per portion and drape on top. Add grated Parmesan and black pepper, and serve.

Kamis, 19 Juni 2008

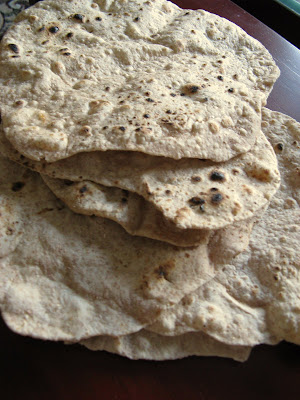
Chapatis

I like eating with my hands. There's something a bit primal about it, but I think it also harks back to childhood when you'd shovel food into your mouth in a most ungainly manner.

As much as I love and adore rice, I prefer eating Indian food with chapatis or parathas. The breads seem to work with curries and dhals better and is a good vessel for conveying the sauces. So I set about making chapatis.

Most of the recipes for Indian food I use come from Mamta's Kitchen. It's an excellent resource for all things Indian, as it's a live online cookbook. This was no exception.

Chapati flour is a whole wheat flour made from hard wheat, which is high in protein and is therefore strong and can be rolled out thin. The recipe said to add water to the chapati flour until you get a soft dough. I then kneaded it for about 5 minutes until it was soft and smooth. I left it for 10 minutes, and then seperated the dough out into balls, ready to be rolled out.

The chapatis should be rolled out quite thin, with the centre staying a bit thicker. I didn't quite manage to master this technique. Next, the chapatis go in a dry frying pan on a high heat.

When cooked, you hold the chapati over a naked flame, like in the picture below, so that it puffs up with steam and blisters. This was fairly risky business as I didn't have a pair of tongs and I had to do a lot of tossing of the chapatis - a few steam scalds later, and they were ready to be wrapped in foil to keep warm.


When eaten straight from the flame and still inflated, these chapatis become 'phulkas'. However, as I had 6 more to make I had to settle with chapatis.

I had these chapatis with raita, chickpea curry and courgettes stir-fried with black mustard seeds and garlic. From start to finish, the whole process took an hour and 15 minutes - not long for a meal that I'd consider fairly complicated.

The chickpea curry is a dish I make at least once a fortnight. It's straight-forward to make, but I'd also like to try making some meat curries as I don't think I have as yet. Watch this space...

Chrysanthemum Tea


When I was a child my mum used to brew us various concoctions; some were foul, others just bearable. One brew she made which I actually liked enough to drink happily is chrysanthemum tea. Whenever we ate too many fried foods or we got spots, the chrysanthemum tea would be made. It is regarded as a 'cooling' and detoxification herb, and is recommended for heat-related illnesses such as sore throats and fevers. It's also reported to treat influenza and colds. Now I'm not sure if I've mentioned it, but I've been struck down with the common cold...

You can buy dried chrysanthemum flowers from Chinese supermarkets. I added them to boiling water, and then simmered them for 15 minutes. Once strained, I added some rock sugar to taste. Once cooled, it makes for a very refreshing drink.

Selasa, 17 Juni 2008

Tofu Tuesday - Korean Kimchi, Pork & Tofu Noodle Soup

I have a dirty stinkin' cold. Not only do I have the holiday blues, wishing the sand were still between my toes, I have the lurgy. Anyone who knows me knows that I don't take illness well. I moan, sniffle, grumble and sulk my way through it.

This soup seemed the best way to go in an attempt to clear out the sinuses. Kimchi is a pungent and spicy fermented vegetable, native to Korea. There are a few different types, such as cabbage, cucumber, radish, mustard leaf etc - I used cabbage. It is said to loaded with vitamins A, B and C so I thought this might be a good ingredient to get me back to my good humoured(ish) self. It's quite spicy and flame-red with the flavour of sesame and has a very pleasing crunch to it.

The average Korean apparently eats around 18kg of the stuff a year - it must be good. I cheated and bought it, as the recipes I've seen for it look lengthy and complicated. As for the tofu element, I used fresh silken tofu to contrast the crunch of the kimchi. I thought it would be super soft and a lot harder to handle than other tofu I've used, but it was very manageable, even for a heavy-handed oaf like me.

Korean Kimchi, Pork & Tofu Noodle Soup
For 2

1 small pack of cabbage kimchi (roughly 200gr)
200gr pork belly, cut into chunks
3 stalks of spring onion, chopped roughly, whites and greens seperate
2 slices of ginger
A handful of thin flat rice noodles (I think they're Laksa noodles, but any rice noodles will do), rehydrated if dried
400mls boiling water
1 chicken stock cube (or use 400mls of chicken stock)
1 red chilli (optional)
1/2 a pack of silken tofu, sliced

Dry fry the pork belly to render some fat out. Discard the fat, and put the pork to one side. Bring the stock to the simmer and add the ginger. Add the pork belly and the whites of spring onion and simmer for 45 mins.

Remove the ginger, add the kimchi in bite-sized pieces and simmer for a further 5 minutes. Spoon the noodles into your bowls. Ladle the soup stock, pork and kimchi into the bowls and toss with the noodles. Lay the slices of tofu on top, scatter with the greens of the spring onion and cover with a plate for a few minutes. The tofu is quite fragile, so adding it to the soup pot and then ladling it into the soup bowls spelled a distaster, so this way the tofu warms up intact.

My sinuses are no less bunged up, but it was still pretty tasty.

Minggu, 15 Juni 2008

Cornish Delights

When I think of Cornwall, I inevitably think of pasties, cream teas, and surfer dudes. I tried my hand at all these things in the week I was in Cornwall. I have to say, I'm much better at eating pasties and cream teas than being a surfer.

There were pasty shops everywhere in Padstow, most selling traditional pasties but also variations, such as spiced chickpea, or even sweet ones such as apple and blackberry. Rick Stein's deli even made crab pasties which I tried; it was quite unpleasant.

The pasty is said to originate from Cornwall, and they were originally made for lunch for the tin miners. As their hands would be dirty from the morning's work, the crimp was what you used to hold the pasty; you'd eat the semi-circle part and throw away the rest. Another rumour is that the pasties were half savoury and half sweet, so that you'd get your lunch and a dessert for afters. We didn't see any of them on sale though.

Being a seaside town, we also managed to get little pots of cockles and crayfish, served with vinegar and served in little polystyrene cups with a toothpick, so quintessentially in the style of the British seaside. I think this was perhaps the only seafood we ate which wasn't related to Stein. They even had jellied eels on offer, but I wasn't brave enough.

I suspect if we made it out fishing we would have gotten our fill, but alas, the seas were too choppy. Before us the skipper had taken out 11 people, and 6 were sick. He didn't fancy our chances. Perhaps we looked too much like city folk, Londoners. He'd probably be right.

One thing I wish more London chippies would do though, is scallops or oysters as a side. Rick Stein's fish and chip takeaway offered shucked or oyster frit and battered or grilled scallops.

Jonathan Swift once reportedly said "He was a bold man that first ate an oyster". I'd be inclined to agree; they're not particularly attractive specimens, but I simply cannot resist them. We went to the chippy twice, and for 90p each I couldn't help myself. I couldn't tell you exactly what type of oyster it was, but they were damn tasty - they were very fresh and sweet. A lot of people I've met don't like the idea of them as apparently they "look like snot". It's hard to convince people that this isn't true. If ever I was given good advice, it was from my dad - "always sniff an oyster before you eat it". Good advice indeed.

Sabtu, 14 Juni 2008

Rick Stein's

Ive just spent a week in Cornwall, in Padstow more specifically. This was the view from the house we stayed at, it was stunning.

Much food was eaten, although not as much seafood as I'd hoped. Apparently it's quite hard to get your hands on fresh seafood unless you're prepared to drive, due to some sort of fishing quota. Apologies on the sketchy details, but I was stuffing a scone with clotted cream into my mouth as I was being told this.

It seems Rick Stein really does own a lot of Padstow - Stein's Patisserie, Cafe, Bistro, Deli, Restaurant, Fish n' Chip shop, School - his name was everywhere. Luckily enough, he's one of my favourite chefs.

The fish and chips were very good indeed, although the queue was phenomenal. The list of fish was a long one, plenty to choose from. They also had the choice of whether to have the fish battered or grilled. Grilled? Grilled fish and chips?! It's batter or nothing for me. I chose hake, as it isn't a fish I've had before. It was meaty and succelent, as I'd hoped. Both the fish and the chips were cooked in beef dripping too. They also had various sides, such as mushy peas (average), chip butties, oysters, and scallops. Of course I indulged.

We also went to Rick Stein's Seafood Restaurant one night. The menu was very long; there was perhaps too much choice and it took us absolutely ages to decide what to have. I eventually settled on the sashimi starter and the Fruits de Mer for the main. The interior of the restaurant was more modern and a bit more fancy than I expected, due to Stein's portrayal of his own style as being very simple and no frills. The service was average - we asked for more time in making our ordering decisions, and subsequently we couldn't get their attention to take our order for quite some time. Nevertheless, the food was delicious.


The sashimi starter had the freshest fish I've ever tasted; generally speaking mackerel isn't my favourite fish to eat in the sashimi style, as I find it can be a bit too strong. This was completely different - it was so fresh that there wasn't even a hint of the metallic undertone you can sometimes get. The salmon, the sea bass and the scallop were the same. So fresh they were almost sweet, and it melted on the tongue.

The seafood platter was a daunting prospect. They gave me too after tool until I had 3 either side of me. As you can see from the pictures, it was huge. Half a lobster, a crab, mussels, a scallop, cockles, whelks, a razor clam, two langoustines... I was in shellfish heaven. It was all served on ice, with mayonnaise, shallot vinegar and a bottle of tabasco. Thoroughly recommended - it was quite extravagant at £45 for the platter, but I'm glad I went for it, especially when I saw the envy in everyone else's eyes.

Selasa, 10 Juni 2008

Warm Chocolate Tart with Candied Orange

choctart1_websize.jpg

Chocolate tarts are an easy seller for most people. Warm chocolaty filling and a crunchy crust make for a delicious dessert at any time of year. This tart has been very popular in the restaurant, and is served with homemade caramel ice cream.

The kitchen has been incredibly warm these past few days although the pastry kitchen - which is generally blessed with more fresh air- has made the heat a little more bearable. The pastry kitchen at l'Ecole is cooler than the other stations in the restaurant but even so, it has been quite the challenge to plate ice cream scoops and run to the front of the kitchen before they look like soup. Rolling out dough has also been a little more fussy than usual, and even on cold marble, the tart dough was very quickly too soft to handle. The trick has been to roll it out on floured parchment paper, and to use a second piece of it to flip the dough around and make sure it doesn't stick.

Heat really is the evil cousin of the kitchen and I'm not sure I'm completely used to performing sometimes tedious or physically demanding tasks while all you I am dreaming about is a pool and iced cocktails. But when I start plating dishes such as this chocolate tart, it's easier to put things back into perspective. This beautiful - and tasty! - food will soon be served to a crowd waiting in the dining room who will, hopefully, leave their table satisfied.

choctart2_websize.jpg

Recipe (makes about 30 individual tarts)
Tart Dough:
450 grams butter
200 grams sugar
2 egg yolks
15 milliliters heavy cream
510 grams flour

Filling:
280 grams of bittersweet chocolate
4 egg yolks
2 whole eggs
55 grams of sugar
Zest of 1 orange
170 grams of softened butter
Icing sugar for garnish

Candied Orange Peel:
Peel of 2 oranges, cut into thin matchsticks
2 cups of sugar
2 cups of water
Extra water to blanch

Dough:
Place the butter and sugar in a mixer and mix until softened - don't overbeat. In a bowl, mix the egg yolks and heavy cream and add slowly to the mixer. Once the mixture is smooth, turn off the machine and add the flour all at once. Mix until the dough holds together but do not overbeat. Let the dough rest in the fridge for at least an hour.
Once the dough has rested, take it out and roll in out gently into a thin disc. Butter 3 1/2 inch tartlet molds and gently cut out circles of dough to fit them. Place the circles to chill in the fridge (or freezer) until they are cold. They should be cold and just maleable enough to be placed in the molds. Even if they seem a little bit hard, press them between your two palms and they will be maleable in no time. They should still be cold when placed in the oven, so try to fill your mold quickly and do them in batches if you plan on making a few. Bake at 325 F (making sure to place beans or another heavy element inside so that the dough does not rise. Bake for about 10 minutes or until the sides of the crust are light golden-brown in color.
Remove the beans and bake for another 2 minutes. Leave to cool.

Filling:
Melt the chocolate. While it is melting, place the yolks, whole eggs and sugar in a mixer. Mix for about 5 minutes, until the mixture thickens and forms ribbons. Add the butter, zest and mix it with a spatula. Add the melted chocolate.
Fill the cooled tart doughs with the filling and bake at 325 F for an additional 6 minutes.

Candied Orange:
Place the peels in a pot of hot water and blanch 3 times to remove bitterness. Make a simple syrup by dissolving 2 cups of sugar in 2 cups of water. Add the peels to the syrup and cook on low heat for about 20 minutes or until the peels are translucent.

Serve the tart warm sprinkled with icing sugar and candied orange.

Minggu, 08 Juni 2008

Chocolate and Raspberry Filled Crepes

Crepes have a always been a sort of weekend tradition in my family. As one of the few recipes that my mother masters to perfection, we were treated to crepes simply dressed with granulated sugar and a squeeze of lemon. At culinary school, we made the classic 'crepes suzette' made with orange compound butter, and flambéed with orange liqueur. The ones featured here were were however filled with melted bittersweet chocolate and raspberries... the main reason being that red berries are delicious at this time of year, and that Oliver and I had an early morning craving for chocolate.

The only real trick to crepes is making sure that there are no lumps in the batter, and that you give the batter time to rest.. so patience is key! I tend to prefer crepes to pancakes because they are so much lighter in taste and texture and really create a blank canvas to play with.. as well as a little taste of home.

raspcrepe_websize-copy.jpg

Recipe:
125 grams (1 cup) flour
Pinch of salt
20 grams (1 tablespoon) of sugar
2 whole eggs
250 ml milk
2 cups of raspberries
Zest of half an orange and lemon
1/2 cup of bittersweet chocolate chips
Room temperature butter

Place the flour, salt and sugar into a bowl and form a well in the center. Add the eggs in the well, whisking constantly to make sure the dry ingredients get incorporated smoothly. Add the milk in small batches. Once the mixture is smooth, leave to rest for an hour in the fridge.

Heat a knob of butter in a non-stick pan. Once the butter starts to foam up, place a ladle of crepe batter in the pan and twirl the mixture to obtain a thin and even layer of crepe. Once the crepe starts to firm up, add a couple tablespoons of chocolate, and sprinkle with orange and lemon zest on one half of the crepe. Add a few raspberries and leave to cook for about 2 minutes until the raspberries start to full apart. Fold in the empty side of the crepe ontop of the filling and cook for another minute. Fold the crepe into a triangle and serve immediately. Garnish with extra raspberries and orange zest. Enjoy!

Jumat, 06 Juni 2008

Flourless Chocolate Cake

At last, a dessert item! It's been a while since I made anything sweet, but the sad fact is that living with just one other person means that when I bake cakes and the like, they rarely get finished.

However, a friend at work asked me to make her a flourless chocolate cake, after I proclaimed that you don't need to go without cake just because you can't eat flour (she's on a strange diet). So after borrowing a cake tin, I set to work.

Flourless Chocolate Cake

6 eggs, seperated into 2 bowls
60gr caster sugar
130gr unsalted butter
300gr plain chocolate (preferably 70%)
Extra butter to grease the tin
23" springform cake tin

Preheat the oven to 180 degrees / gas mark 4. In a bowl over a saucepan of simmering water, melt the butter and the chocolate. Whisk the egg whites to form stiff peaks, and then whisk the egg yolks with the sugar until pale and creamy. Add the chocolate and butter mixture to the egg yolks, mix thoroughly and then fold in the egg white. Pour into your tin and then bake in the middle of the oven for 20 - 25 mins. Leave to cool, and turn out.

This cake was ridiculously easy to make and really delicious. You could get it done in 40 mins total if you had an electric whisk. You can also do something fancy, like dust it with icing sugar, or edible glitter - perhaps even Maltesers if you like? I found it tasted even better after it had been cooled and refridgerated for a bit.

Rabu, 04 Juni 2008

Tofu Wednesday - Tom Yum Squid & Tofu Soup

Tofu Tuesday had to be put on hold as I was out for a curry. I didn't want to miss a Tofu Tuesday as it's good to keep up the momentum, so here it is... on Wednesday.

My previous recipes used Mori-Nu tetrapak firm silken tofu so it was time to branch out. I used
fresh regular tofu, which came in a plastic tub covered in water, obtainable from Chinatown. It was quite a different texture to the Mori-Nu stuff; the texture was a bit rougher, but it was still fragile and care needed to be taken in handling it.

I had limited supplies in the fridge and I didn't want to buy more, as I'm on holiday for a week on Saturday. I made do with what I had in the fridge and freezer: coriander, spring onions, green beans and squid. The obvious choice would be a stir-fry but a touch boring, no?

Soup is a good way to show off the tofu - it takes on the flavour of the broth well, and provides a contrast in textures.

Tom Yum Squid & Tofu Soup

For One

300mls stock (I used a chicken stock cube)
3 slices of galangal
2 sticks of lemongrass, white parts only
50gr dwarf beans, sliced into 2cm pieces
About 100gr tofu
About 100gr squid, scored and chopped into large pieces
3 kaffir lime leaves
2 red birds eye chillis
Small bunch of coriander, roughly chopped
2 stalks of spring onion, sliced
1 lime
2 tbsp fish sauce
2 tsp Nam Prik Pao (a smoky chilli sauce)

Simmer the stock with the chillies, galangal and the lemongrass for 20 mins. Sieve the stock to get rid of the bits. Add the dwarf beans and simmer for a further 7 mins, adding the tofu after about 4 mins. Add the squid and the lime leaves roughly torn, bring to the simmer and take it off the heat. Stir in the Nam Prik Pao (I use Pim's recipe, which you can find here). In your bowl, add the juice of one lime and the fish sauce. Pour the soup into the bowl, toss the spring onions and the coriander on top. It's a spicy soup, so reduce the Nam Prik Pao or don't add the chillis to the stock if you can't take the heat.

The squid, lime leaves, galangal and lemongrass all came from the freezer. It's handy to go to the Oriental supermarkets to stock up on these things, as they last forever in the freezer. I can't really think of anything to replace the lime leaves, they are really essential and they lend a great fragrance. I served this with a pile of white rice to spoon the soup over. I think to date this had been one of the most successful Tom Yum soups I've made. To my knowledge the squid and the tofu aren't traditional, but they made for a very delicious and healthy soup.

Senin, 02 Juni 2008

Steak Out

I'm not much of a potato fan. Sure, I love Daphinois potatoes, chips, fries, crisps, mashed potato, hash browns and the rest, but sometimes I just don't love them enough to be bothered to make them. This steak dinner was a classic case. I came home ravenous and surveyed the fridge - I had all the necessities, but none of the motivation to be peeling, slicing, or frying; nor the patience to be waiting for it to cook!

I'm a committed omnivore, it must be said. A brief foray (3 months) into pescatarianism when I was 14 confirmed that I didn't want to be without meat, besides which steak has to be up there on the list of satisfying meals. I'm always nervous of ordering it when I'm out as seldom places get your cooking request (rare) right. Home-cooked steak is the way forward. Similarly, simple is best. As nice as they are, I can do away with all those red wine reductions, BĂ©arnaise, peppercorn or Diane sauces. Just a pat of Dijon mustard is good for me. How do you like yours?


Minggu, 01 Juni 2008

The Grass Is Always Greener

There are some dishes that my parents made when I was living at home which I can't seem to replicate. There was always something missing, something that wasn't quite right about it which made it quite infuriating - this is one of them. It was adapted from a Nigella Express recipe, a raw mushroom pasta. I had to get this snap while I was at home visiting this weekend in the hope that my next attempt will be as tasty. It really is a great recipe - the salty smokiness of the pancetta mixed with all the other ingredients makes for a very moreish dish. I could eat heaps of it.


Raw Mushroom Spaghetti

To serve 4

500gr spaghetti

10 closed cup or chestnut mushrooms, sliced finely

1 large handful of curly parsley chopped finely

1 tbsp capers, chopped roughly

2 tbsp olives, chopped roughly

4 cloves garlic, chopped finely

3 or 4 large pieces of sundried tomatoes in oil, chopped roughly

2 boxes (around 200gr) of pancetta

4 tbsp extra virgin olive oil

Parmesan to grate over

Cook the spaghetti to al dente and drain, reserving some of the cooking water. Fry the pancetta until crispy, and then add all the ingredients to a big bowl and mix well. Add the spaghetti and loosen with the water if needed. Toss well and serve, topping with the parmesan and black pepper.

The heat from the pasta cooks the mushrooms a bit and the oil and water work well to emulsify into a coating so that it's not too dry. There are a lot of strong flavours in this dish, like the raw garlic and the parsley so it's not for the faint-hearted. I love robust flavours so it's perfect for me. Hopefully now I'll be able to successfully make it at home.